Tutorial Shapash Backend
This tutorial describes how to use the Shapash backend class with different implementations. It also explains how to construct your own backend and connects it with Shapash.
Content: - Build a classifier and an encoder - Analyze the model with Shapash SmartExplainer (usual way) - Add specific parameters to Shap explainer
We used Kaggle’s Titanic dataset and House Prices
[1]:
import pandas as pd

from sklearn.ensemble import RandomForestClassifier, RandomForestRegressor
from category_encoders import OrdinalEncoder, OneHotEncoder, TargetEncoder
from sklearn.model_selection import train_test_split

from shapash.data.data_loader import data_loading
from shapash import SmartExplainer
[2]:
titan_df, titan_dict = data_loading('titanic')
titan_df = titan_df.drop(columns='Name')
[3]:
y = titan_df['Survived']
X = titan_df.drop(columns='Survived')
[4]:
# Encode catgorical columns
onehot = OneHotEncoder(cols=['Pclass']).fit(X)
result_1 = onehot.transform(X)
ordinal = OrdinalEncoder(cols=['Embarked','Title']).fit(result_1)
result_2 = ordinal.transform(result_1)
target = TargetEncoder(cols=['Sex']).fit(result_2, y)
result_3 = target.transform(result_2)
is_categorical is deprecated and will be removed in a future version. Use is_categorical_dtype instead
[5]:
encoder = [onehot, ordinal, target] # Used by Shapash
[6]:
Xtrain, Xtest, ytrain, ytest = train_test_split(result_3, y, train_size=0.75, random_state=1)
[7]:
clf = RandomForestClassifier(n_estimators=10, min_samples_leaf=2, random_state=0).fit(Xtrain, ytrain)
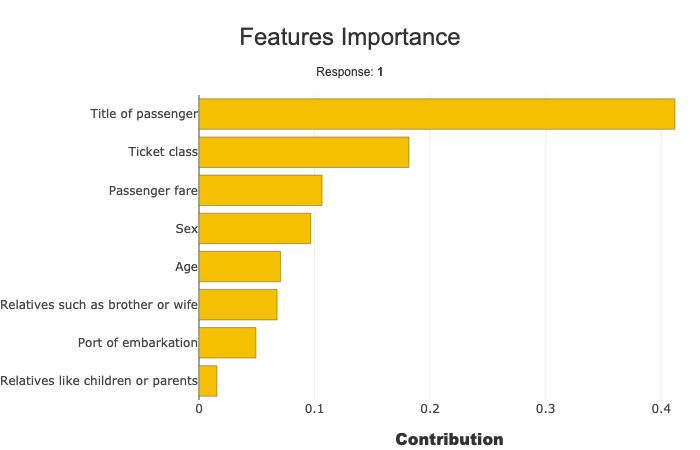
Default behaviour : shap backend
Below we use the usual way of compiling Shapash using Shap Explainer backend to compute local contributions.
[8]:
xpl = SmartExplainer(model=clf, preprocessing=encoder, features_dict=titan_dict)
[9]:
xpl.compile(x=Xtest,
    y_target=ytest, # Optional: allows to display True Values vs Predicted Values
    )
[10]:
xpl.plot.features_importance()

Add specific parameters to the backend
[11]:
# This way you can add any argument to the Shap Explainer object
explainer_args = {"algorithm": "tree"}

xpl = SmartExplainer(
    model=clf,
    preprocessing=encoder,
    features_dict=titan_dict,
    explainer_args=explainer_args
)
[12]:
xpl.compile(x=Xtest)
[13]:
xpl.plot.features_importance()
Change the bakckend used to compute local and global contributions
You can select another backend using the backend parameter.
First way : using a string
data parameter used by Lime to declare the background.[14]:
xpl = SmartExplainer(
    model=clf,
    preprocessing=encoder,
    backend='lime',
    data=Xtrain,  # Specific arg used by our backend (here Lime)
    features_dict=titan_dict
)
[15]:
xpl.compile(x=Xtest.iloc[:20]) # Computations can take some time, we select only 20 observations
100%|███████████████████████████████████████████████████████████████████████████████████████████████████████████████████████████████████████████████████████████████████████████████████████████████████████| 10/10 [00:00<00:00, 46.65it/s]
 40%|████████████████████████████████████████████████████████████████████████████████                                                                                                                        | 4/10 [00:08<00:12,  2.06s/it]
[16]:
xpl.plot.features_importance()

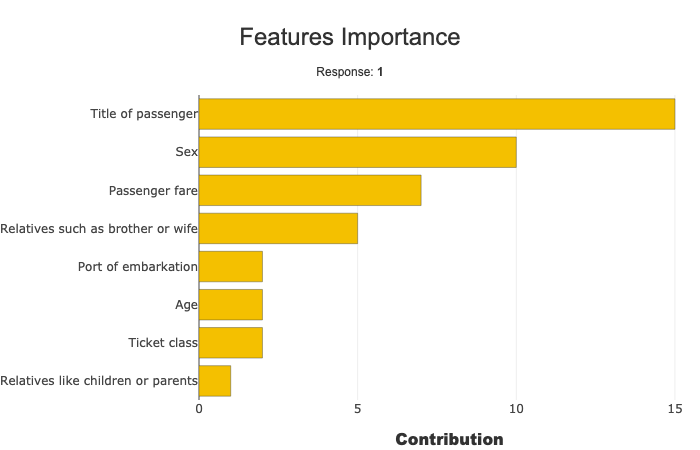
Second way : using the backend class
backend parameter.ShapBackend and LimeBackend[17]:
from shapash.backend import LimeBackend

lime_backend = LimeBackend(model=clf, data=Xtrain)

xpl = SmartExplainer(
    model=clf,
    preprocessing=encoder,
    backend=lime_backend,
    features_dict=titan_dict
)
100%|███████████████████████████████████████████████████████████████████████████████████████████████████████████████████████████████████████████████████████████████████████████████████████████████████████| 10/10 [00:00<00:00, 42.17it/s]
[18]:
xpl.compile(x=Xtest.iloc[:20])
40%|████████████████████████████████████████████████████████████████████████████████ | 4/10 [00:08<00:12, 2.01s/it]
[19]:
xpl.plot.features_importance()
Define a custom backend
Finally can define your own backend inheriting the Shapash base backend class BaseBackend.
Each inherited class must at least define the following method : - run_explainer : this method should implement all computations that require time to execute. The result of this function (explain_data which should be a python dict containing at least contributions key) will then be used by other methods.
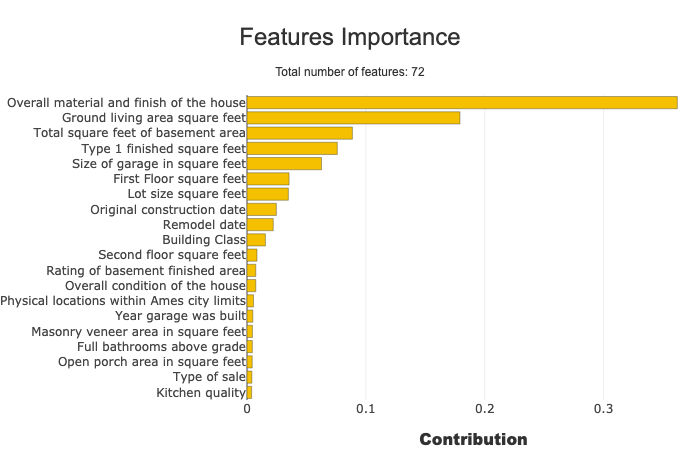
Below we define our own backend using KernelExplainer implemented by Shap with a regression example using the house prices dataset.
Note : this implementation is very flexible and also allows to perform your own computations of local contributions and global feature importance. If you are interested in modifying the way to compute global features importance, for example, you can redefine the
get_global_features_importancedefined in the BaseBackend class. See the code of our implementation of AcvBackend for a complete example.
[20]:
house_df, house_dict = data_loading('house_prices')
[21]:
y2 = house_df['SalePrice'].to_frame()
X2 = house_df.drop(columns='SalePrice')
[22]:
# Encode categorical features

categorical_features = [col for col in X2.columns if X2[col].dtype == 'object']

encoder2 = OrdinalEncoder(
    cols=categorical_features,
    handle_unknown='ignore',
    return_df=True
).fit(X2)

X2 = encoder2.transform(X2)
is_categorical is deprecated and will be removed in a future version. Use is_categorical_dtype instead
[23]:
X2_train, X2_test, y2_train, y2_test = train_test_split(X2, y2, train_size=0.75, random_state=1)
[24]:
# Train a model
model = RandomForestRegressor().fit(X2_train, y2_train)
A column-vector y was passed when a 1d array was expected. Please change the shape of y to (n_samples,), for example using ravel().
[25]:
import shap
import logging
from shapash.backend import BaseBackend
logging.getLogger('shap').setLevel(logging.WARNING) # Disable info logs

class CustomShapBackend(BaseBackend):
    def __init__(self, model, data, preprocessing):
        super(CustomShapBackend, self).__init__(model, preprocessing)
        self.explainer = shap.KernelExplainer(model=model.predict, data=data)

    def run_explainer(self, x):
        shap_contributions = self.explainer.shap_values(x)
        explain_data = dict(contributions=shap_contributions)
        return explain_data
[26]:
custom_backend = CustomShapBackend(model=model, data=X2_train.iloc[:20], preprocessing=encoder2)

xpl = SmartExplainer(
    model=model,
    preprocessing=encoder2,
    backend=custom_backend,
    features_dict=house_dict
)
[27]:
xpl.compile(x=X2_test.iloc[:15])
[28]:
xpl.plot.features_importance()